Thursday, December 24, 2015

Fabulous Vintage Christmas

Hello!
Today I'm saying goodbye to the BFS Design Team! I'm so grateful for being given this opportunity to work with a fantastic and talented team of DT gals and the generous supplier, THANK YOU!

I have a bunch of my final projects to share today, created with the fabulous Vintage Christmas collection.
Starting off with a layout, featuring my Mom and Grandma, in their young years.


As usual, I have cut and arranged the border pieces inside the layout, to create a point of interest. Those borders are absolutely amazing! Few pieces of BFS chipboard complete the composition. I kept my layout in beige and red tones, therefore the chipboards are plain. Only the title  got one layer of clear UTEE, so it sticks  out.

Supplies:
Papers - Vintage Christmas, BFS mist - Cotton candy, chipboards - Floral lattice, Clip frames, Quilted page panel.


My second project is a mini-album made on a canvas base. I rarely work with this form but I can say, creating it was just so much fun! Now it's just waiting for this year's Christmas photos.
To have a little bit of variation, I combined plain chipboards with the embossed ones.


Supplies: Papers - Vintage Christmas, BFS embossing powder - Cotton candy, chipboards - Snow medley, Seeing stars, Flutter medley, Word ornaments.

I want to thank you all for this year spend together and wish you all even more inspiring and boosting with creativity year 2016!
Big hugs!
DT Zanka (Zaneta G)

Wednesday, December 23, 2015

Mixing it Up ~ Sandi's December Projects!

Hello, Blue Fern visitors! 
Sandi here with you today sharing my 3 December projects.
It's so hard to grasp that 2015 is almost over! 
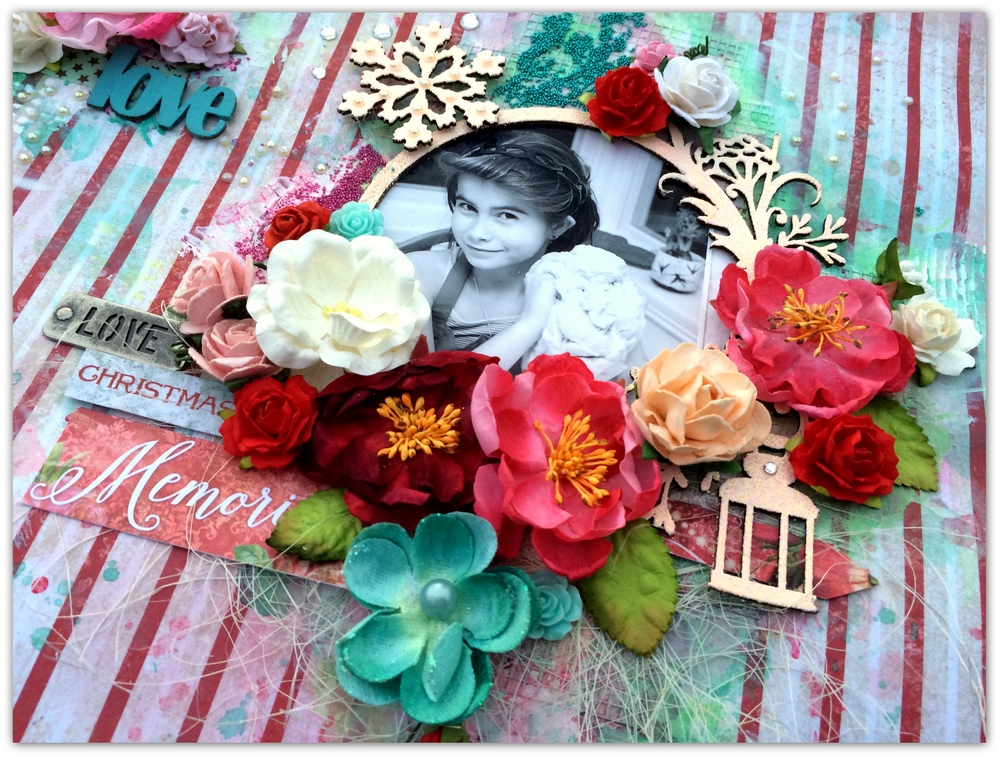
"Memories"

First up is a layout using the Vintage Christmas collection. I used a variety of papers as listed below and then built my background with super heavy gesso, a stencil and Imagine Ink mists in Persimmon, Cotton Candy and Leaf. 


My Clip Frame was treated with Cotton Candy mist and then heat embossed using both Petal and Poinsettia. The Berry Stem on the left was misted with Imagine Ink in Leaf and variegated with a random ink pad. The Blooming Foliage peeking from beneath the photo was treated the same. A few microbeads were added to both for more texture. 


The Garden Lattice Bits were misted with Cotton Candy and then randomly embossed with Petal and Poinsettia.  You can also see I've used a snippet of the Blooming Foliage tucked into my cluster. 


One last close-up

Blue Fern Studios Products Used:
Paper:
Vintage Christmas Deck the Halls
Vintage Christmas Magical
Vintage Christmas Greeting Cards

Chipboard:
Garden Lattice Bits
Clip Frames
Berry Stems
Blooming Foliage

Imagine Ink mist:
Cotton Candy
Persimmon
Leaf

Embossing Powder:
Poinsettia
Petal

***

"Dream"

I love scrapping with purple! And since I haven't had a lot of opportunity to use the DejaVu collection yet, I took this time to do so.
  (Love this early ingenue photo of Lucille Ball, 1930s. Photo credit to Tumblr, original photographer unknown.) 

The spectacular Circle Vine Frame seemed the perfect choice to add a little drama to my layout. It was coated with gesso, then misted with Imagine Ink in Jingle Bells. I did a little random embossing with a clear powder and then added in some purple with one of my gelatos. 


The Framington Medley was treated the same and used as a background layer. To emphasize my photo, I used color around the Circle Vine Frame and mixed in some microbeads as well. 


You can see some of my stamping in the background using the Garden Frolic stamp. 


I used more of the gelato color to create an ombre look on my Dream title. I finished the page with some random paint splattering. 

Paper:
DejaVu Lustre
DejaVu Tresors
DejaVu La Plume

Chipboard:
Framington Medley
Circle Vine Frame
Wish, Wonder, Dream

Stamps:
Garden Frolic

Imagine Mist:
Jingle Bells

***


"Merry"

Here I am again using the Vintage Christmas collection. I've tried to photograph this layout multiple times and cannot seem to capture it's true appearance. IRL, it is so sparkly and pretty! 
The background was treated with gesso and Imagine Ink in Winter Mint. 
This LO is based on the December sketch and is of one of my grandsons with a great-granddad, so sweet. 


The Holiday Frame was misted with our Leaf mist and then blinged up with our Lucky embossing Powder! The shine is gorgeous! I've tucked in some fussy cut flowers. 


The Wood Ornament was treated with Petal and Poinsettia embossing Powders. A bow and flower finish it off! 
I used one of the Halftone Stamps around the outer edge of my layout for depth and interest. 


I added some personal touches with cheesecloth, peals and flair. 

Blue Fern Studios Products used:
Paper:
 Vintage Christmas Wonderland
 Vintage Christmas Greeting Cards
 Vintage Christmas Deck the Halls
 Vintage Christmas Magical

Chipboard:
Wood Ornaments
Holiday Frame

 Embossing Powder:
Petal
Poinsettia 
Lucky

Mist:
Winter Mint
Leaf

Stamps:
Halftone

That wraps it up for December and for 2015! 
I am thrilled to be back with Blue Fern Studios again next year! 
See you then! 

Tuesday, December 22, 2015

December Inspiration & Video Tutorial by Marilyn Rivera

Hello Blue Fern fans! Today I share with you a layout that I made with the new gorgeous Vintage Christmas collection and the new Christmas chipboards. I also worked with the fabulous embossing powders and the new mist in my project.
I selected the Holiday Frame, Word Ornament, and the Holiday Vine chipboards that I gave different techniques that you can see in the video tutorial at the end of the post. This beautiful paper is "Noel"from the Vintage Christmas collection.

I used the Lucky and Fern embossing powder on my chipboards.

I cut out this cute red house from the "Greeting Cards" papers.

I selected one of the word ornaments chipboard as my tittle. 


Here's the video tutorial....I hope you enjoy it and get some inspiration....


Thanks for stopping by...until next time!
Marilyn Rivera


Monday, December 21, 2015

Bente's December farewell

Hi there friends.
Today is my last post here on the Blue Fern Studios blog, but it's definitely not the last 
time you'll see me creating with these gorgeous products. 
So we won't say Goodbye but instead Au Revoir. :-)

Today I have a  couple of pages and some cards to share .

For my first page I picked one of the pretty new papers from the  Vintage Christmas collection.


I also have some close ups of the details:


I used the Petal embossing enamel to treat my chipboards. That gorgeous round piece is called Twilight Garden Frame. I gave the Shabby snowflake (part of a set) the same treatment. 
I love the look of those tiny half pearls that I added to it!


On my background I used the Winter Mint and Cotton Candy Imagine Ink mists. I also used gesso and microbeads as well as a few paints.


For a title I used one of the designs on the Christmas cards sheet together with the word Christmas from one of the bottom strips.


I love the look of the strict stripes with the soft colourful blooms.


On my next page you'll see a familiar face :-)  
(Yup that's me  in one of the rare photos of me that I like. :-D, I know I've scrapped it a couple
 of times already LOL)

I used the Juliannas Dream paper from the magical Ombre Dreams collection
Such a beautiful and feminine collection, and so versatile too! I always love the combination of yellow with purple. I can't say why I love it so, except I find it sooo,sooo pretty!


And even here I have close ups to share:


I painted most of my chipboard pieces purple and gave them a lick of gesso on top to make them a bit more shabby.The Chained Bits look great here down the side of my photo. They are a good background for layering any kind of embellishment.


The Timeless Floral corner adds so much to a page. It's so great because you can turn it
any way you want so it will work in any corner 


I wanted a title thet was not too overpowering so I went with a single chipboard word that I painted and clear embossed. 


I added a some punched and die cut greenery as well.

And to round things off I have a couple of simple Christmas cards that I'd like to share with you.


The first one I made with one of the cards from the Christmas card sheet and added the bottom strip from a sheet down the sides. I used the Petal embossingpowder again.
The Framed Winter words are perfect for a card front.


On my second card you can see that even other non-christmassy collections can be used for seasonal cards. My background here is from the Montage collection, but the top sentiment is from the
Vintage Christmas collection of course. I added some bits from the Chain link 
chipboard panel that I painted a dark red. I used a little of the Cotton Candy Imagine Ink
on the background and  a stencil on top.


That was all from me! I want to a big THANK YOU to Leslie and Valerie for having me.
It's been a pleasure!!

I hope you all have a wonderful peaceful Christmas time wether you celebrate or not.
Merry Christmas and Peace on Earth!

Saturday, December 19, 2015

Projects with Angelica

Hello everyone! I'm sharing today my final projects as a BFS design team member. It's been an amazing and fun year!  I'm so honored to have had the opportunity to design for such a wonderful company!

I made this layout using the Autumn Anthology collection.  I started with the Newsworthy paper as my background and layered then Penmanship on top.  I painted the Large Roman Clock, Damask Panel and Spring branch chipboard pieces with gesso. Then lightly misted with the Leaf mist.

For this layout I used the Frolic collection. Such pretty soft colors!  I did some layering with the Secretary paper. Then used some pieces of the Calling Cards and Dans de Jardin. Again, I painted the Floral Lattice Bits, Timeless Floral Corner, and Petite Windows with gesso. They sprayed using the leaf and Cotton Candy Mist.

So, I've used up all of the Vintage Christmas Papers that were sent to me! I decided to make a quick card using a scrap piece of the Wonderland paper.  This is my take on the sketch using the Gingerbread House Chipboard. I used a thick uneven coat of Heavy Gesso and sprinkled colored glitter glass while still wet.

 Thanks for stopping by during this busy holiday season!


Thursday, December 17, 2015

Vintage Christmas Collection - winter feeling

Hi, so nice you found the time to visit the blog in the busy Christmas weeks.
Not everybody on this world celebrates Christmas .
Today I want to show you that the beautiful Vintage Christmas collection can also be used on other themed layouts . 
The first one is a mixed media page on my favorite paper from the collection.
                               The background is gessod and for the color I used alcohol inks.
               The title piece xoxo was painted white and I added some fairydust when it was still wet.
                       It gives a beautiful glitsery shine, which is hard to see in the picture.


I cut a Brick Ring in two and colored it with two colors ink.
The background stamps come from my favorit stamps out of the collection 
 textures


*******


My next layout is made after the beautiful sketch for this month challenge.


For me,  this picture shows the line between fall and winter.
I wanted to mirror the picture in my background.
There is a lot of stamping going on .
The chipboard grid piece was perfect to tuck under my photo cluster.
It holds the natural feeling I like .
The titel piece is embossed in dark brown.

*******
Thanks for visiting the blog and Merry Christmas to all of you.

x Wilma x


Wednesday, December 16, 2015

Vintage Christmas Inspiration From Debbie

Hi everyone!  Debbie here with you today.  The month has flown by and I've been busy preparing for Christmas. Still lots to do but somehow it always comes together.   Today I have 3 layouts I created with the Vintage Christmas paper collection.    

My first layout features Magical, Deck The Halls, Noel and Greeting Cards papers,  perfect to highlight an old Polaroid picture of my daughter. Lots of layering and fussy cutting.

I used the two pieces of the Paisley and Vine Flower Chipboard which I embossed with the Imagine Ink Poinsettia Embossing Powder.  Love the red and gold in the powder!


On the side of my photo I used the Jasmine Pendant chipboard, again embossed with the Poinsettia embossing powder.

My second layout features the Noel and Greeting Cards papers.

I used a mixture of 2 embossing powders, Petal and Poinsettia on the Classic Corner and Symphony Border chipboard.  I applied some masking on the background and sprinkled the medium with the Phoenix Glitter.


The title Noel is from Winter Titles, again embossed with a mixture of  Petal and Poinsettia embossing powders.  I lightly misted a doily with some Imagine Ink Persimmon Mist.

My final layout was created using the December sketch with the Wonderland, Greeting Cards and Noel papers.  I did some masking on the background paper and randomly added some Pyrite Glitter and splatters of the Persimmon and Jingle Bells Imagine Ink Mists.

I embossed Joy from Word Ornaments with the Poinsettia embossing powder.

Here I placed the Snow Medley chipboard under my photo.  I painted the chipboard with some white gesso and applied some gold micro beads.

Tucked beneath my layers is the Damask Flourish covered in Pyrite glitter.
                 
I hope you have enjoyed my layouts.  Don't forget that you still have time to enter our December Sketch Challenge.  You can find all of the details here.

Thanks for stopping by!
. . . Debbie