Showing posts with label Bird Ornaments. Show all posts

Wednesday, July 18, 2018

Megan's July Projects

Hi Everyone,

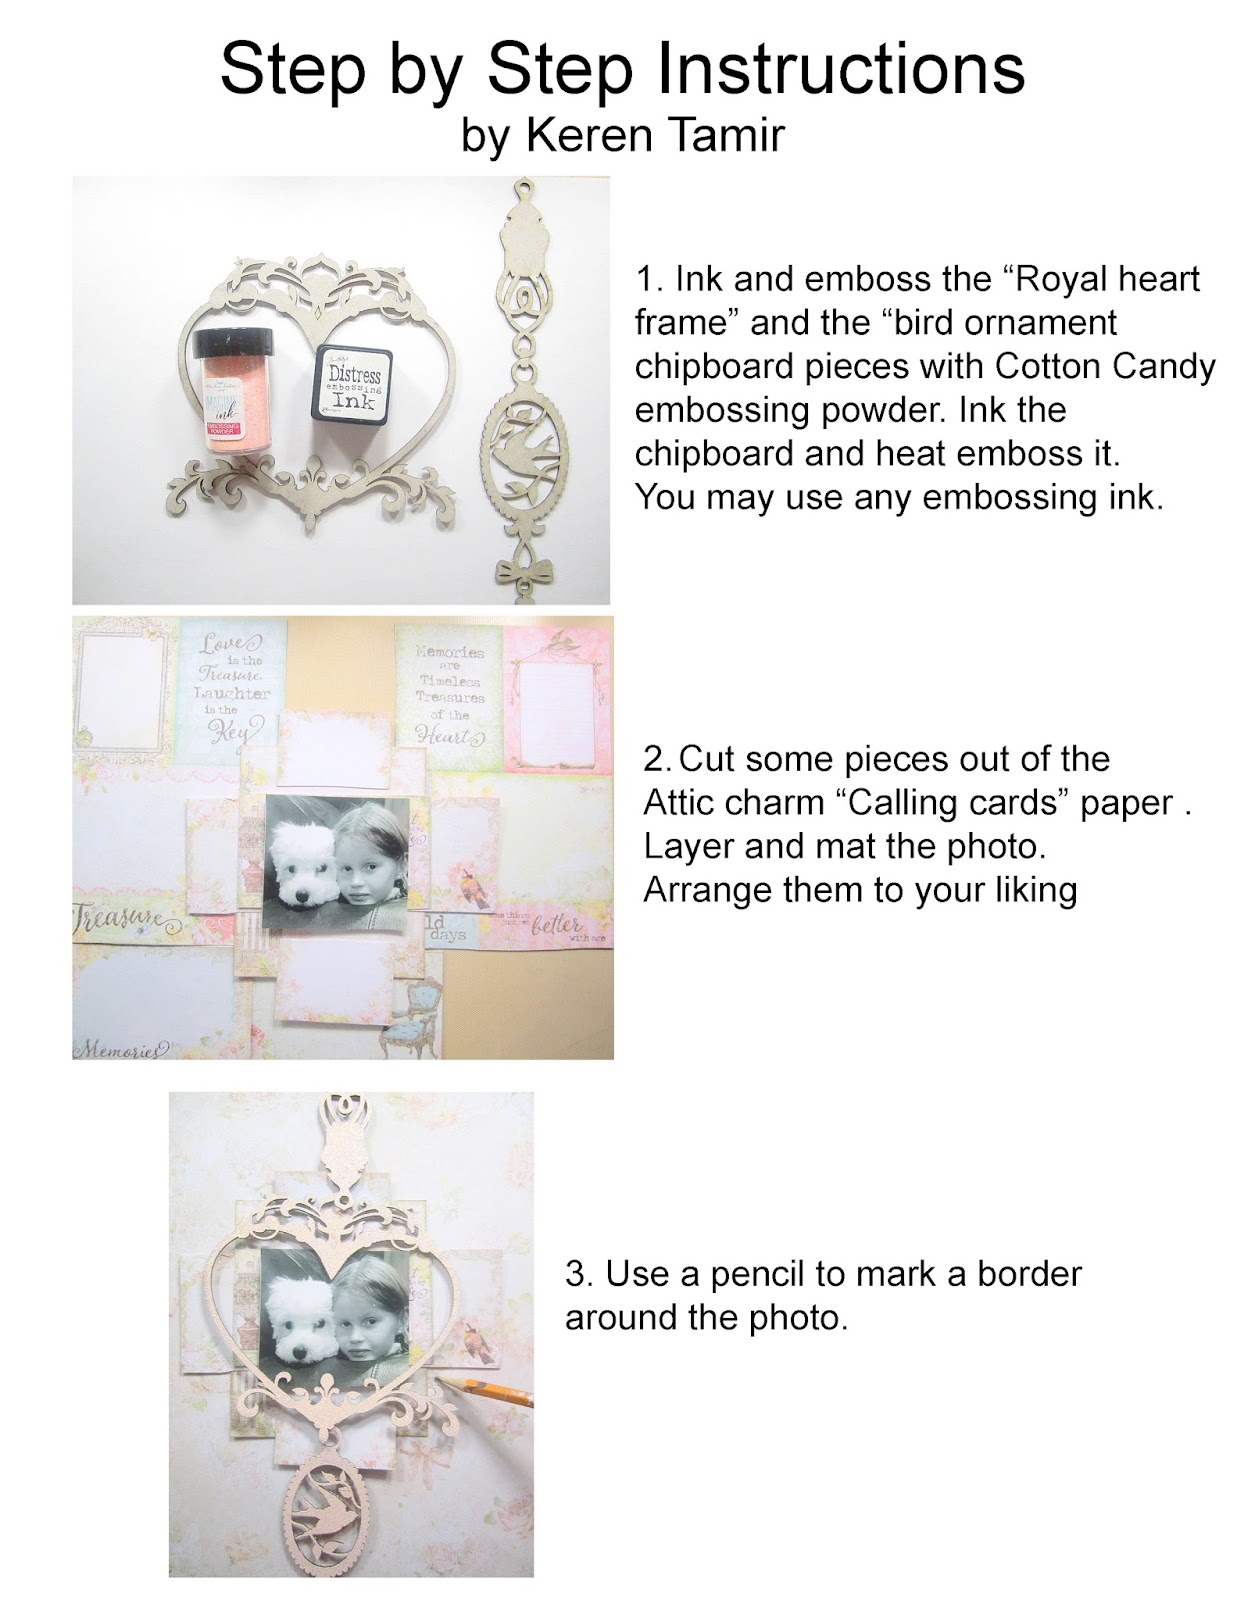
Today I have three projects to share with you, two layouts and an OTP project, and Ive used three different collections.

Autumn is one of my favourite times of year because of all the abundance of colour in changing leaves.  We had a photo shoot with our dogs in autumn and this photo is one of my favourites from the shoot.


My background paper is from the Wanderlust collection.  I have inked around the edges with oxide ink and also used that same ink to use on a stencil in the background.


To alter my chipboard Checker Bits, Ive used the new embossing powder Napa Valley - the photos do not do this embossing powder justice, it is simply stunning!


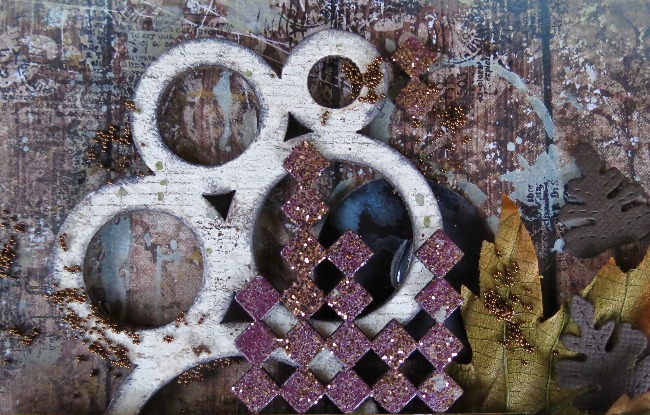
For the Circle Groups chipboard I have embossed it with Ivory and then stamped lightly with stazon ink and then inked around the edges.  Ive also used the negative pieces throughout the layout as well which makes this particular chipboard set very versatile! You might also be able to see some random stamping in the background as well.


The chipboard here originally said "I love you more" and was all joined together.  I removed the 'more' from the title to use at a later date and I was left with "I love you".  I have painted this set white and then inked half of it with the same oxide ink from earlier.


Products Used

Patterned Paper:
Wanderlust - Lakeside

Chipboard:
Circle Groups
Checker Bits
I Love you More

Embossing Powder:
Ivory
Napa Valley

Stamps:
Tattered Newsprint
For the Birds

Seedlings:
Twig

Flowers:
Wanderlust Lillies


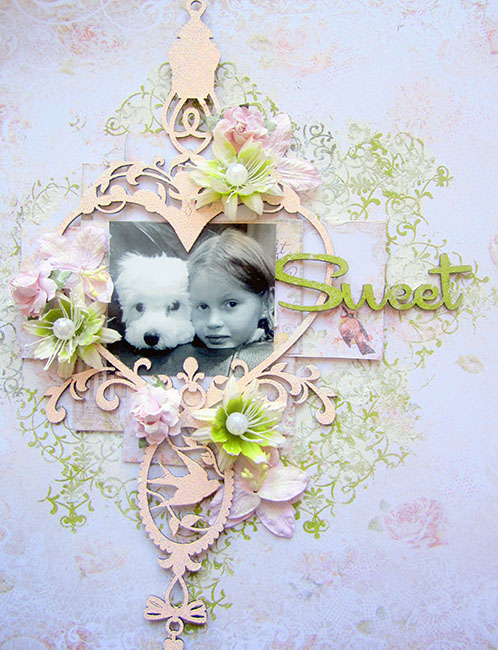
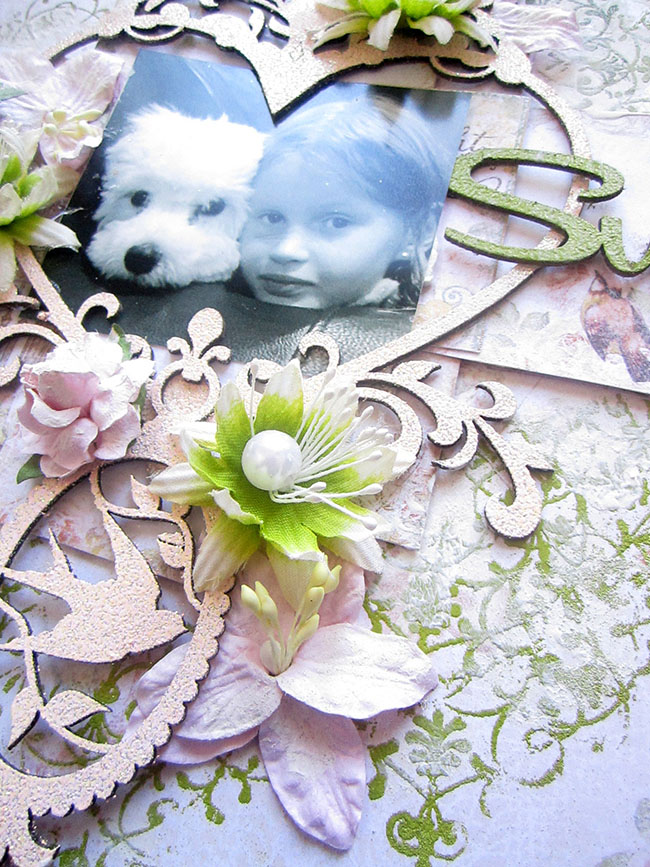
My second layout uses the gorgeous floral Blush collection.  I love the fussy cut-ability of this paper collection!


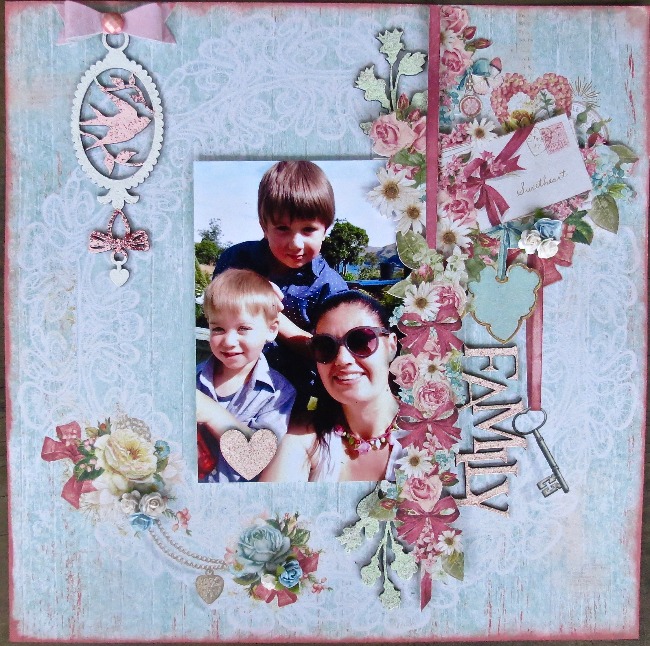
I left my base piece of paper plain, just inking round the edges with an oxide ink - I felt that all my fussy cutting together with the graphics of the paper provided enough detail, and I didn't want to detract from that.  Ive tucked some additional chipboard into my cluster at both ends.  I added another piece of chipboard in the top corner to draw the eye across the page and gave this piece a two tone effect with two embossing powders.


To add to the detail of the graphics on my paper I added a few tiny rosebuds which helps that wee cluster look more dimensional and gives it a little pop!


To help add some dimension to the page I have layered the two different fussy cut pieces onto scrap chipboard - in total there are three layers to this page.


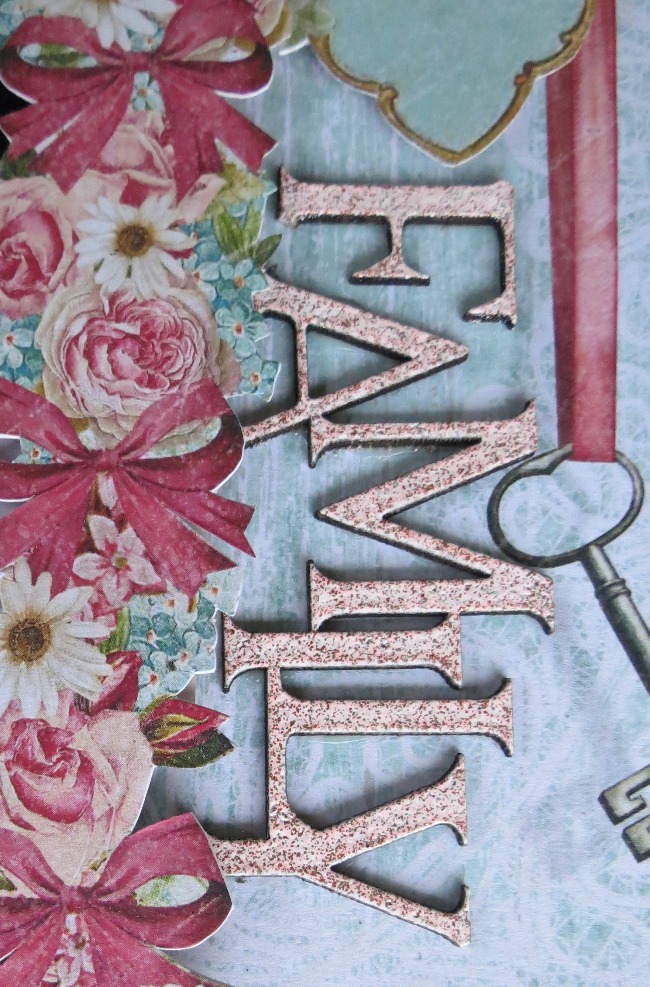
My chipboard word was part of butterfly circle, I just removed the piece I wanted from the whole piece and then embossed it.


Products Used

Patterned Paper:
Blush - Key to My Heart, Sweetheart

Chipboard:
Bird Ornaments
Butterfly Circle

Embossing Powder:
Green Ivory
Pink dust
Pink Peppermint


My final project today uses my all time favourite paper collection HomeSpun.  Theres something about this collection that just makes me sigh with delight!


I had found this frame in a sale and it was the perfect colour for what I wanted, I just sanded it to give me a distressed look.  
I chose this piece of paper because it made me think of those picture/pin up boards you can make with fabric on the background and then ribbon that goes across the board in both directions with pins where the ribbon intersects??  Well I wanted to recreate that look.
I added brads to the joins of my paper ribbon.  I cut into the sides of my paper ribbon to allow me to tuck my bit and pieces into it.  And then I fussy cut in to the paper and moved that fussy cut piece to sit on top of my base paper so that it fit inside my frame.
I have decorated the top with a chipboard flourish piece - embossed white - and a cluster of flowers.


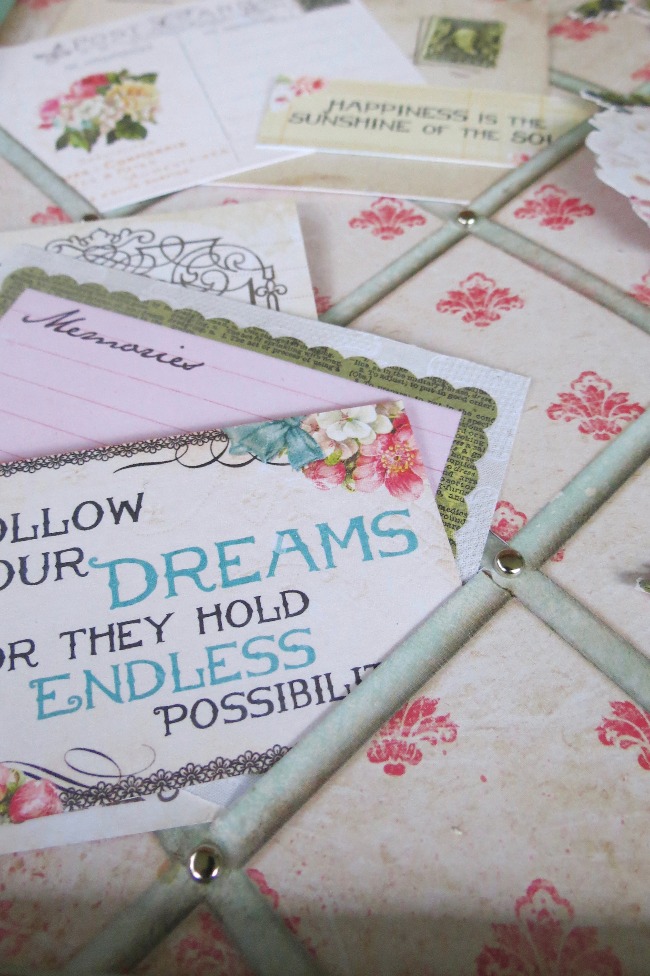
I picked some of my favourite pieces of cut aparts, from various collections and tucked them into my pin board.


Products Used

Patterned Paper:
HomeSpun - Picturesque

Flowers:
Wanderlust Lillies

Embossing Powder:
Snow


Thats three quite different projects for you today, I hope theres been something there to give you some inspiration!  see you next month :)

Monday, July 18, 2016

Two Layouts with Attic Charm- with step by step and video Tutorials by Keren Tamir


Hi Everyone,
Keren here and this month I've created two layouts with the Attic Charm collection.
The first layout has a step by step PDF tutorial and the second layout has a step by step video tutorial.
Enjoy!!

"Sweet"


My first layout this month is a "Sweet" pastel layout using the Attic Charm Mercantile paper as the background. This is a cute picture of my daughter with our dog Cookie!!
Below is a step by step tutorial on how I created this layout.


The Bourbon Street stamp was used below:


<<<<<<<<<<>>>>>>>>>>

Here is my second layout. This one has a video tutorial below.

"Contentment"


Here is the video tutorial:


and here are some close-ups of the layout!!


Thank you so much for visiting the Blue Fern Studios Blog
Have a wonderful day!!

Keren

Wednesday, April 27, 2016

April Inspiration by Elena Volchkova

Hi everyone! Today, I have prepared three layouts using the beautiful Blue Fern Studio materials. And I'm happy to show them to you.

Adventure's layout

My first layout about travelling and adventures at sea. Pirate spirit and eco style.
I used the Meadows of Time paper from the Sanctuary collection. It's lovely combination of colors.
Chipboard "Born to be Wild" I colored with Heavenly and Seven seas Imagine Ink Embossing Powders.
Leaves from the "All Natural Set" was covered with Imagine Ink Lime embossing powder.
Bird from сhipboard set "Birds in Flight" toned white acrylic and decorated with Postal Textures Stamp.
In my project you can seу the many eco-friendly elements such as wood saw cuts, cork, stars anise, craft, thread and stones.
Blue Fern Studio Supply List:
Paper:  Sanctuary - Meadows of Time
Chipboard: Born to be Wild, Birds in Flight, All Natural Set
Stamps: Postal Textures
Imagine Ink Embossing Powder:  Heavenly, Seven seas, Lime

Dreamy layout

My second april project you can already see. This layout I have made for the Blue Fern April sketch.
This layout is about a girl, which need to believe in yourself and know that she is beautiful!
I used the Main Street paper from the Timeless Collection as my background paper.

 "Wish" сhipboard was covered with mixture of Garnet Imagine Ink embossing powder and Merlot Glitter. I used the Burnt Copper glitter to color the chipboard Renaissance Border.


Blue Fern Studio Supply List:
Paper:   Timeless- Main Street, Serendipity - calling Cards
ChipboardRenaissance Border, set "Wish, Wonder, Dream"
Stamps: Romantic Accents
Imagine Ink Embossing Powder: Garnet, Nutmeg, Copper
Glitters: Autumn, Burnt Copper, Merlot
Flowers: Courtship Blooms, Courtship Roses

Green spring layout

Spring layout for one more wonderful young girl. Many flowers and tenderness. The mix of a great paper for background - Love Story (calling Cards) and Frolic (Allegro).

Bird Ornaments Chipboard was covered with Imagine Ink 14 Karat embossing powder and cracle past on the bird.
Сute little elements and Brocade Texture Stamp on the background.

Sprigs Blooming Foliage сhipboard was covered with mixture of Imagine Ink embossing powders in Lime and Sage, which give the the perfect combination! Courtship Blooms flowers added volume and charm.
Blue Fern Studio Supply List:
Paper:  Love Story- calling Cards, Frolic - Allegro
Chipboard: Bird Ornaments, set "Wish, Wonder, Dream", Blooming Foliage
Stamps: Brocade Texture
Imagine Ink Embossing Powder: 14 Karat, Lime, Sage
Flowers: Courtship Blooms

I hope you enjoy viewing my projects. See you next time :)
Hugs, Elena

Saturday, February 13, 2016

February Projects by Bec Genet

Hi everyone, today I'm here today with my February Shares. I've made layouts with the amazing my Blush and Timeless collection. 

Special


I used the new Blush collection for this layout. To start my layout I began my tearing the edge of the Reminisce paper from the Blush collection. I layered the torn edge under the paper as well as adding the border strip in too. I attached these layers to a strip of the Enamored paper to make a full 12x12 page. Next I took the rest of the Enamored paper to mat my photo.

To add details to the background I used the brick stamp from the Essential Textures Stamp set with the Cotton Candy embossing powder. I also used some modeling paste through a script stencil. 


I coloured all my chipboard with embossing powder on this layout, I used the Icicle embossing powder on the main part of Ruth's Doily and Cotton Candy on the centre piece of the doily, I used  Icicle again on the word 'Special' from the Perfect, Adorable, Special Word Set. And on the Flourish Medley I used Icicle, Cotton Candy and Honey.


I cut the Ruth's Doily into two pieces, one larger than the other. I tucked the larger piece under my photo and the small piece to the edge of the page, with the centre piece of the doily popped under the flowers on the side of the photo. Next I tucked the Flourish Medley under the other side of my photo to add interest to both sides of the photo. 
Finally I layered on all my embellishments, I used flowers, cheesecloth, resin pieces, buttons, pearls and vellum butterflies


Blue Fern Studios Products Used
Paper: Blush collection - Reminisce and Enamored 
Chipboard: Ruth's Doily, Flourish Medley, and Perfect, Adorable, Special Word Set.
Embossing Powder: Icicle, Cotton Candy and Honey
Stamps: Essential Textures Stamp

Adorable


For this layout I used the Fondness paper from the Blush Collection as my background paper, and a piece of the Sweetheart paper to back my photo.  


To my background I added some light pink stamping with the Weathered Doily Stamp, I put pink Gelatos through a flower stencil and then some white texture paste with a flourish stencil 


I embossed the chipboard word 'Adorable', from the Perfect, Adorable, Special word set with the embossing powders Buttercup and Cotton Candy. I coloured the chipboard pieces from the Bird Ornaments and the Leafy Rings (the large one in pack) with Gelatos 


I mounted my photo on cardboard to prop it up and layered flowers around my photo. I cut the Leafy Rings in half, one half went under the top corner of my photo, the other tucked under the flowers. I glued the on of the Bird Ornaments to the top of the page and added flowers down one side. For extra embellishing I used seam binding ribbon, pearls, resin and mini lace flowers


Blue Fern Studios Products Used
Paper: Blush Collection - Fondness and Sweetheart 
Chipboard: Bird Ornaments, Leafy Rings and Perfect, Adorable, Special word set 
Embossing Powder:  Buttercup and Cotton Candy
Stamps: Weathered Doily Stamp


Sassy


This layout was made using the February Sketch

I used the Timeless Collection on this layout, I chose the back side of the Calling Cards as my background paper, then I backed my photos on the Abode paper. 


On my background I used the Vintage Edges stamp set with the Iris embossing powder. Next I mixed modeling paste and a light beige mica powder to put through a flourish stencil. 


I used this same mix of paste and mica to cover the a piece from the Classic Ornaments set. I then went around the edges of the chipboard with brown ink before I tucked in between my paper layers. 
I covered the Deco Shelf chipboard piece with the embossing powder in Oatmeal, I tucked this under the bottom of my photos. Then I covered the chipboard word Sassy, from the Cute, Sweet, Sassy word set, with embossing powder in Garnet. 


 I added some flowers in coordinating colours, putting little peices of frayed cheesecloth amongst them. Finally I added a few vellum butterflies and pearls to complete the layout
 

Blue Fern Studio Products Used:
Paper: Timeless Collection - Calling Cards and Abode
Chipboard: Classic Ornaments, Deco Shelf  and Cute, Sweet, Sassy word set
Embossing Powder: Iris, Oatmeal and Garnet 
Stamps: Vintage Edges

Thanks for visiting today

Bec